Roofing

How Roofing Repair Can Save You Money

Unlike a fresh coat of paint, a new roof offers an opportunity to fix the entire house’s problems. Fortunately, Roofers Cape Coral are fairly straightforward and inexpensive.

Start by entering the attic or crawl space and looking for damp spots. Black marks, mold, sagging beams—those are red flags.

roof repair

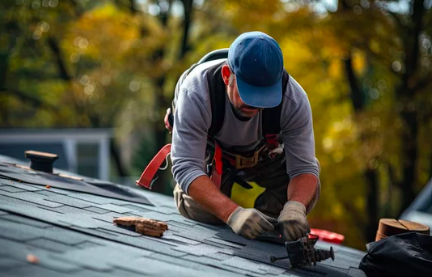
If your roof has suffered damage from a severe wind event, it’s important to have the broken shingles replaced promptly to avoid further damage to your home. Your homeowner’s insurance will often cover the cost of replacing these shingles. If you’re not confident in your ability to replace shingles, you should hire a professional roofing contractor to handle the repairs.

Start by accessing the area of your roof where you wish to repair a damaged shingle. It’s important to use a safe ladder and secure it well at the base before climbing up on the roof. Then, carefully evaluate the damage. Look for raised shingles, particularly around the edges of your roof. Lifted shingles can allow moisture to penetrate the roof deck and cause leaks or even rot.

Using a pry bar, loosen the shingles above the shingle you wish to remove. Pull up the tabs of the shingle to reveal the nails beneath, and then remove them. Next, slide a new shingle under the tabs of the one above it, positioning it where the damaged shingle used to be. You’ll have to cut the new shingle to precisely fit its location, which is sometimes difficult without damaging it.

Once you’ve installed the new shingle, apply roofing cement under the nipples to help seal it and prevent water leaks. If you want to camouflage your repair, check the gutters for granules that have washed down from the shingle and then sprinkle them over the top of the sealant to hide it.

You’ll have to repeat this process for each damaged shingle on your roof. However, if you take the time to ensure each shingle is properly installed and sealed, it will protect your home from further damage and increase the life of your roof.

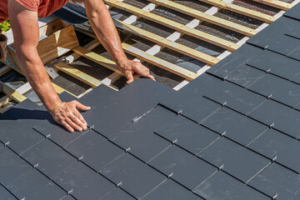
There are several different methods for securing shingles to the roof, including nails, adhesive strips, and staples. Most experts recommend that you opt for nails, as they’re the most durable. You may also find that your shingle manufacturer has specific directions regarding fastening methods and materials.

Over time, flashing can become damaged. Often, this is the result of repeated exposure to moisture. In other cases, it can be the result of corrosion or simply wear and tear. Whatever the cause, it is important to repair this damage as quickly as possible because it can allow water to seep underneath shingles and eventually deteriorate the wood roof deck. This can lead to leaks and ultimately a roof replacement.

Typically, roofing contractors will remove the old flashing and install new material as part of their roofing repair. However, it is possible to do this on your own if the extent of the damage is not too extensive. This is a project that requires some risk because you will need to be up on your roof and it is essential that you use a sturdy ladder and take all the proper safety precautions.

It is also important to have the right tools and know how to do this properly. The first step is to clean the area and then seal it. If you are not experienced with this type of roofing, it is recommended that you hire a professional to do this for you.

If the flashing is severely damaged or rusted, it may need to be completely removed and replaced. This will require the removal of some shingles as well. In this case, it is important to ensure that the new flashing is sealed correctly. A good way to do this is to use flashing tape, which can be purchased from any roofing supplies store.

The short gray pipes protruding from your roof are more than just a pretty visual feature – they play a key role in the roofing ventilation system. However, these vents can become a trouble spot for water infiltration if the rubber boots crack or wear out. Fortunately, the roof vent boot is an easy and inexpensive item to repair by yourself or with a roofing professional.

The standard plumbing pipe boot is made of rubber and usually lasts a minimum of ten years but can degrade more quickly depending on the quality and weather conditions. If you are experiencing a roof leak near a plumbing vent or noticing that the rubber is cracking around the pipe boot, it is time for a replacement.

There are a few different types of roof vent boots available to replace your damaged one. Some are aluminum, galvanized steel or copper and come with a collar that seals over the roof vent pipe. Some even have a built in flashing that eliminates the need for extra roofing flashing material. The cost of these ranges from about $20 to $50 each.

To repair the existing rubber vent boot, you need to first loosen the shingles around the vent and above it using a pry bar. Make sure to use a metal pry bar and not plastic, as this can cause the shingle to tear, creating a potential leak spot. Once the shingles have been loosened you can pull up the existing boot and flashing and then install a new one.

In addition to replacing a leaking pipe boot, you will also need to apply some caulk around the base of the vent to ensure there is a good seal and prevent moisture intrusion. You can find caulk at your local hardware store, although a rubber roofing patch is a better option if you are repairing a cracked vent boot.

This is a fairly simple DIY roofing project, though you should avoid climbing on the roof without the proper safety gear and knowledge of how to do so properly. If you are not comfortable working on a roof or don’t have the right tools, it is always best to call a professional to do the work for you.

Whether due to age or weather, roof shingles can get damaged. Repairing or replacing them isn’t a difficult project, but it can be time-consuming and expensive. You can do it yourself or hire a professional contractor to handle the job for you. Regardless of which option you choose, it’s important to have a good understanding of roofing repair.

The first step in the process is to inspect the shingles for damage. Look for signs of cracking, missing pieces and fading. Once you have a clear picture of the condition of your shingles, it’s time to replace them. It’s a good idea to choose a cooler day for this project, since shingles become brittle in hot weather. It’s also important to equip yourself with a sturdy ladder and, for steep roofs, a safety harness.

Before attempting to replace a damaged shingle, you should remove the surrounding ones. This will help you access the nails that hold the shingle in place and allow you to remove it. To do this, gently break the seal on the shingle immediately above the one you want to remove. Then, pry up the surrounding shingles with your flat pry bar, being careful not to break them.

You may need to remove a few adjacent shingles to make room for the replacement, but it’s important not to leave too much space between the edge of your shingle and the eaves. This can allow water to seep into your home and damage the interior.

After removing the damaged shingle, it’s important to clean up debris. This includes the nails that were holding it in place, as well as any granules that fell off during the process. You can pick up these granules and place them in a bag for disposal later, or you can use them to patch small holes on your roof. Finally, you should apply a coat of waterproof shingle cement to the new shingles to keep them protected from moisture and other environmental factors. It’s important to do this regularly, as it will help your shingles last longer and protect your home from water leaks.

Roofing

Why Roof Inspections Is Important?

Your roof is under constant attack from weather, debris, and sun. It’s important to protect it and catch problems before they become serious issues that can compromise the integrity of your home. Inspectors look for the condition of shingles, including curling or missing granules and moss, to do Roof Repair Johns Creek. They also check soffit boards and gutters and examine the condition of penetration seals on vent pipes and other roof penetrations.

Walk-Around

roofer

A professional home inspector has a special eye for problems, including those hidden within the walls and ceilings of a house. During a roof inspection, the inspector will walk outside the home and look at gutters, eaves, and soffits for damage or deterioration. This gives the inspector an idea of what they might find once they get on the roof itself, and it helps them create a plan for where to focus their attention.

The next step is to enter the attic, which allows the inspector to see if there are any issues with the insulation and roof ventilation. The inspector will also be able to identify water stains and other evidence of a leaky roof. Inspecting the attic will help the inspector determine whether a potential problem could be caused by the roof itself or by something else, such as a foundation issue.

If the attic inspection finds nothing alarming, the inspector will climb a ladder to walk on the outside of the roof. This is the most important part of the roof inspection, because it lets the inspector see how well the shingles are in place and the overall condition of the roof. In many cases, the inspector will take core samples from various points on the roof to evaluate the condition of the different layers of material. This will indicate whether the roof needs to be replaced right away or if it would hold up with some basic repairs.

While on the roof, the inspector will also examine the condition of any add-ons to the house such as skylights, chimneys, and vents. These can contribute to a leaking roof if the materials aren’t installed correctly or if they suffer from poor workmanship down the road.

Once the inspector has walked around the entire roof, they will write up their findings in a report. They will classify them according to color, with red indicating the most severe problems that need immediate attention, orange indicating common issues that can be repaired by a general contractor, and blue indicating simpler concerns that may not need any action at all.

Ladder Inspection

A recent tragedy at a roofing company highlights the importance of ladder inspections. One of the technicians was using a ladder to access a roof for a routine inspection and repair, when he felt the ladder begin to give way under him. He held on for safety and waited until another technician could set up a new ladder to continue his work. Ladders are involved in a substantial number of worker fall injuries, which makes them an important workplace risk to mitigate with thorough ladder inspections.

Ladders are not meant to be used as climbing aids, but rather to help workers get up to the right height for their jobs. To make sure ladders are safe to use, they must be inspected regularly, before and after each use. This involves a detailed visual and physical check of the entire ladder, from its feet to the top rungs. Ladders should be inspected in accordance with government regulations and best practices.

The frequency of ladder inspections depends on several factors, including how often the ladder is used, its location, exposure to unwanted environmental elements like salt air, and relevant mechanisms installed on the ladder. The inspector must consider all these factors to determine the ideal frequency of inspections.

During ladder inspections, employees should look for any components that are prone to corrosion. These components include ladder rungs, rails, fasteners, hatches, and ladder extensions, among others. Ladders that are corroded are not safe for use. Employees should also look for any other signs of damage to the ladder, such as bowed or twisted rails.

In addition to examining ladders for potential problems, employees should ensure that the ladder is correctly positioned and secured. Workers should not place blocks, boxes, or other materials under the ladder to “level” it, and they should not try to gain height on the ladder by extending beyond its intended length. If the ladder is found to be unsuitable for use, it must be tagged and put out of service, and any tools or equipment on the ladder should be removed.

Whether it is a simple or complex ladder, it is essential that every component of the ladder be checked before each use. Ladder non-compliance can lead to serious bodily injury and loss of life, as well as expensive fines for the employer. To prevent these violations, employers should familiarize themselves with the OSHA guidelines for ladders and implement them in their workplaces.

Attic Inspection

An attic inspection offers a wealth of information to combat problems like high energy bills, poor indoor air quality and mold growth. It also provides a bird’s-eye view of the roof structure and ventilation systems. According to Brian Cooper of Cooper Inspection Services, LLC, the attic inspection reveals “the quality and quantity of insulation; the presence of any moisture, mold or pests; the condition of vent stacks, ductwork and the attic hatch; and the status of the roof.”

A thorough attic inspection includes a review of the framing boards, sheathing, trusses, insulation and ventilation system. The inspector will check the quality of the insulation and ventilation, looking for signs of moisture issues, such as stains on the sheathing or trusses; water marks on the vent pipes; and matted or changed texture insulation that may indicate a buildup of mold and other contaminants. In addition, the attic inspection will check the condition of the rafters and trusses to determine if they are damaged or in need of repair, or if there are areas of over-loading or incorrect bracing.

The attic inspection should also include a visual assessment of the ductwork and vent stacks, ensuring that they are not blocked, leaning or improperly installed. If the home has a whole house fan that vents into the attic, the inspector should note this in the report.

Depending on the home’s wiring, the inspector will look for any wires that are running through the attic and ensure that they don’t have any insulation over them, which could create a fire hazard. In addition, the inspector will make sure that the recessed light fixtures are properly insulated.

An attic inspection can reveal a host of other items, such as soot on the rafters that may indicate a previous fire break out in the home; droppings, nests and chewed wiring that may be signs of rodent infestation; or tunnels and wood shavings that could indicate a termite problem. The inspector will document all observed issues in a detailed report and discuss them with the client. They may recommend a specific course of action or suggest additional evaluations and repairs.

Visual Inspection

A visual inspection is a common non-destructive testing method that examines the surface of an object to identify defects. Visual inspections are used in a variety of industries, including aerospace, power generation, chemical processing, and manufacturing. This technique uses minimal or no tools and only takes a short amount of time to perform. However, a visual inspection only looks at the surface of an item, so it is often used in tandem with other NDT methods to ensure complete and accurate results.

In order to conduct a visual inspection, the inspector needs to be qualified for the specific task. This requires rigorous training and good eyesight, as well as a thorough knowledge of the product or material being examined. In addition, the inspector must be able to read and understand the results of the visual inspection to identify defects.

The American Society for Nondestructive Testing (ASNT) has guidelines in place to help organizations establish a qualification program for visual inspections. The organization’s SNT-TC-1A document provides recommended education, experience, and training requirements for NDT personnel that perform visual inspections.

As technology continues to advance, visual inspections are becoming more automated and accessible. Maintenance professionals can now use remote cameras, drones, and specialized robots to inspect equipment that is hard to reach or housed in a hazardous area. These RVI tools can also capture images and relay them back to the team, reducing human error and improving efficiency.

Visual inspections are a crucial part of quality control and safety assurance across many industries. They are typically conducted by trained maintenance technicians and may be combined with other NDT techniques. Regulatory agencies like the FDA and OSHA set standards for inspections in specific industries and applications to ensure compliance with their regulations.

The visual inspection procedure is difficult to standardize due to its subjective nature. However, the inspection process can be outlined and documented to create a flow chart and checklist that can be made easily available to maintenance technicians and quality control managers. These documents can be incorporated into a CMMS solution like Facilio to make them easily accessible to the entire team.